Reading from sensors is great but there are times when you need to interact with surrounding hardware. Window air conditioners, televisions, stereos and many other household electronics communicate with infra-red (IR). Adding an IR LED to your spark core will allow you to control these electronics remotely. For example, I’m currently using a temperature sensor along with an IR LED and Spark Core to turn my window AC unit on and off based on ambient temperature and time of day.
There are two types of IR LEDs 950nm and 850nm. The type of LED you’ll need will depend on the specific device you plan to control. You may want to pick up a couple of each type to be safe. We’ll use an IR receiver to read the IR code from the devices existing remote.
[Update 10/19/2014] A 330 ohm resistor should be used with a 5v power supply (Arduino boards). The Spark Core has a 3.3v output so you should use a 100 ohm resistor instead. Switching to a 100 ohm resistor resulted in much better range for the IR LED. [/Update]
For this example you’ll need:
– 950nm IR LED $0.95
– IR Receiver $1.95
– 100 ohm resistor 330 ohm resistor
– A Spark Core $39.00
– A soldering iron and solder
– An Arduino Board (optional)
Pro’s of IR LEDs:
– Cheap
– Easy to use
– Work with existing hardware
Con’s of IR LEDs:
– Requires physical proximity to the target device
– Signals are one directional (no feedback loop)
Pre-requisites:
Spark Core connected to your WIFI and ready to accept new sketches via the web interface. You should also be familiar with IR LEDs. There are plenty of tutorials available. In this example, we’ll be focused on the Spark Core specific hook up and code.
Step 1: Record Your IR Signal
Each button on your existing remote outputs a unique IR signal. Before you can send an IR signal with the Spark Core, you must first record that signal from your remote using the IR Receiver. I find it easier to use the serial output from a standard Arduino board (instead of the Spark Core). Record the raw signal from one of the buttons on your existing remote using this tutorial. Copy and paste the raw output, we’ll be using it later.
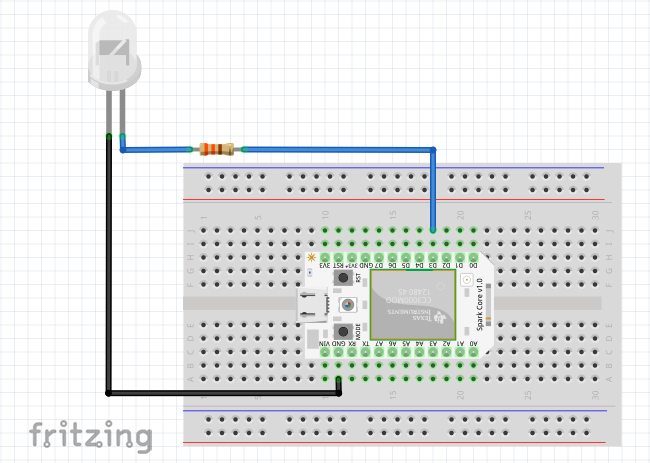
Step 2: Connect the IR LED to Your Spark Core
Use a 100 ohm resistor 330 ohm resistor. Connect the negative wire to the Spark Core ground. Connect the D3 pin to the 100 ohm resistor 330 ohm resistor and then to the positive wire of the LED.
Step 3: Add the IRremote Library
Qwertzguy ported the IRremote library from Arduino to Spark Core. You can find the library here. Add the .cpp and .h files to your Spark Core project using the + button in the top right corner of your project.

Step 4: Write the Spark Core Code (IRremote.ino)
// This #include statement was automatically added by the Spark IDE.
#include "IRremote.h"

int commadDevice(String args);

IRsend irsend(D3); // hardwired to pin 3; use a transistor to drive the IR LED for maximal range

// Use the raw code you recorded from your device, in this example the length of the code is 37
unsigned int rawCodes[] = {8300, 4200, 450, 1650, 450, 1650, 450, 1650, 450, 600, 450, 1650, 450, 600, 450, 1650, 450, 1650, 450, 4250, 450, 1650, 450, 1650, 450, 600, 450, 1650, 450, 600, 450, 600, 450, 650, 450, 600, 500};

void setup()
{
  Spark.function("toggle", commadDevice);
}

int commadDevice(String args)
{
    int rawSize = sizeof(rawCodes)/sizeof(int); // In this example, rawSize would evaluate to 37
    irsend.sendRaw(rawCodes, rawSize, 38);
    return 1;
}
Flash the new sketch to your device.
Step 5: Command Your Device
# EXAMPLE REQUEST
curl https://api.spark.io/v1/devices/YOUR_DEVICE_ID/toggle \
     -d access_token=YOUR_ACCESS_TOKEN