Product Review: Moshi ClearGuard for the MacBook Pro

I use protective covers on all of my electronics. I recently purchased the Moshi ClearGuard keyboard cover for my MacBook Pro. In addition to protecting against spills, it also helps keep the keys free of grease. I have oily fingers which translates to shiny keys within months without a cover. This was a must have product for me.

Moshi ClearGuard Keyboard Cover

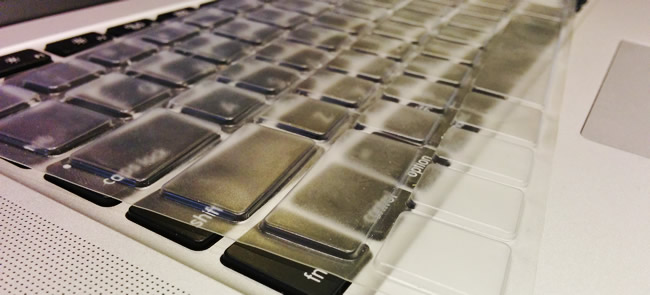
Moshi Keyboard Cover (lifted slightly off the keys)

Pros

Easy to Install

Compared to other keyboard covers, this one was easy to install and fit perfectly out of the box. Installing the cover almost felt too easy. You just take it out of the packaging and set it on the keyboard. That’s it. I searched the box looking for instructions and ended up watching a YouTube video to be certain that I had not missed a step. No adhesive tape or instructions needed.

Washable

The keyboard cover is durable and easy to clean. Just lift the cover off the keyboard and wipe it down with warm water. Make sure to let it dry completely before putting it back on the keyboard. I’ve washed mine a couple of times in the past month and it still fits great.

Protective

Having the cover on my keyboard gives me piece of mind. In addition to protecting against spills, it also collects dirt, crumbs and grease. I frequently eat lunch at my desk and no longer have to worry about pasta sauce or cookie crumbs getting into my keys.

Cons

Cost

At $25, it’s not cheap. For comparison, a similar cover for my old Fujitsu laptop was $14. Either way, if you protect even a single spill, it would pay for itself. The cover has the added benefit of increasing the re-sale value of the device by keeping the keyboard looking new. It would be great to see this product closer to the $15 marker. Unfortunately, I wasn’t able to find any quality competitors for the MacBook Pro.

Easy to Remove

This could be a pro or a con. The cover rests on top of the keyboard. The cover for my Fujitsu laptop sealed around the edge with double sided tape. This helped keep it in place and further protected from seeping liquid (in the event of a spill). On the other hand, it does make the cover easier to clean.

Makes the Screen Dirty

As with all protective covers I’ve owned, the dirt tends to rub off on the screen. This is not permanent and can be easily wiped off but an inconvenience nonetheless. Something I’m gladly willing to do for the piece of mind it provides. I keep a micro fiber cloth in my bag to use for wiping off the screen once a week.

Bottom line, protect your investment with a Moshi keyboard cover.

Full product name: Moshi ClearGuard MB for Pro 13″,15″,17″ White MacBook (2009) MB air 13″ US Layout (99MO021901).

Use Forever.js to Log Data from Your Spark Core

Intro

As an alternative to using PHP & MySQL, you can use Node.js with Deployd and MongoDB to store data retrieved from a connected home device. JavaScript normally runs on the client machine. With Node.js, you can run JavaScript code directly on your server allowing you to write directly to a database (DB) without PHP.

In this example, we’ll query a Spark Core every 10 minutes and store the temperature data in MongoDB. We can then use Deployd to create a simple API end point to use for requesting historical data. This can be used in combination with a mobile app or web interface to visualize historic temperature data.

Prerequisites

You need to have a basic understanding of Node.js and have a server (or localhost) set up with Node.js and npm installed.

Warning: Do not install Deployd to your public_html directory or put any server side JavaScript files in your public_html directory on a live server. Always put server-side JavaScript files at least one directory above your public_html folder to prevent others from being able to open and view the contents of your files. Unlike PHP, someone can navigate to your JavaScript file and view it’s contents. This is fine for client-side JavaScript but bad for server-side JavaScript that may contain API keys or DB credentials.

You will need to install the following libraries. Remember to use “-g” (global install) when installing via npm so you have access to the libraries in all directories.

Deployd

After installing and configuring Deployd, create a table called temperature with fields temperature, humidity and timestamp. Make sure that you are able to successfully read and write information to MongoDB using the Deployd API you just created.

Sample Code

Update the DEPLOYD_PORT, DB_PORT, DEVICE_ID and API_KEY to match your configuration. Put the code at least one folder above your public_html folder in a file called production.js.

// production.js
var deployd = require('deployd');       // Interface to the database
var request = require('request');       // Make requests to external server
var CronJob = require('cron').CronJob;  // Execute requests on interval

// Set up deployd with mongodb information
var server = deployd({
  port: DEPLOYD_PORT,
  env: 'production',
  db: {
    host: 'localhost',
    port: DB_PORT,
    name: 'deployd'
  }
});

// Start listening for requests
server.listen();

server.on('listening', function() {
    // Store a reference to the Deployd temperature table
    var temperatureStore = server.createStore('temperature');
    
    // Run every 10 minutes. Write the data to the Deployd table.
    new CronJob('00 */10 * * * *', function(){
        // Make request to the Spark Core
        request("https://api.spark.io/v1/devices/DEVICE_ID/result?access_token=API_KEY", function(error, response, body) {
            // Access results as JSON data
            var result = JSON.parse(JSON.parse(body).result);
            // Convert the timestamp to seconds
            var timestamp = new Date().getTime() / 1000;
            // Write the data as a new row into the Deployd temperature table
            temperatureStore.insert({temperature: result.data2, humidity: result.data1, timestamp: timestamp}, function(err, result){
                if(result) {
                    // Success! 
                }
            });
        });
        
    }, null, true, "America/Los_Angeles");
});

server.on('error', function(err) {
  console.error(err);
  process.nextTick(function() { // Give the server a chance to return an error
    process.exit();
  });
});

Start your script with forever.js

Navigate to the folder you put the production.js file and run the following command.

forever start production.js

Conclusion

This code will run until your server is restarted. You can add a command to your server start up to ensure Forever.js starts up after a reboot.

Why Node.js? Because it’s fun! Rather than learning PHP, you can leverage your JavaScript knowledge to write server side code. I haven’t run any benchmarks myself, but from what I’ve read, your server hardware plays a much bigger role in performance than the software solution you use (MongoDB vs. MySQL). Use what you feel most comfortable with. Understanding all available solutions will help you select the best option given your specific project needs.

Android Lollipop: -505 Error for AIR Apps

Problem:

After upgrading to Android 5.0 (Lollipop), a number of my apps disappeared. Trying to re-install them from the market resulted in a -505 error. This problem is most common with cross-platform Adobe AIR apps, more specifically, apps signed with an SHA1 generation with some certificates. The upgrade to Lollipop doesn’t correctly translate these specific keystores. When the apps disappear, the mismatched keystore sits around in memory preventing the app from being re-installed.

Update: Blog post from Adobe acknowledging the problem. Android 5.0.1 should resolve this issue without any action needed from developers. The release date for this is still TBD.

This impacts some very high profile games and can also impact in app purchases. Since the root cause is with the certificate, this isn’t limited to AIR apps. Native apps are much less likely to be using one of these keystores but it may be worth testing either way. Instructions on how to validate your key: https://code.google.com/p/android/issues/detail?id=79089#c8

“You can run the following commands on the META-INF/CERT.RSA from your signed APK file to check if your key is affected by this issue:

> keytool -printcert -file CERT.RSA
> openssl pkcs7 -inform DER -in CERT.RSA -outform PEM -out CERT.PEM -print_certs
> keytool -printcert -file CERT.PEM

The two keytool commands print out the fingerprints. If they do not match, the key is affected by this issue.”

Solution:

The only solution I’ve seen is to manually uninstall each affected package via ADB. After doing that, I was able to re-install the apps directly from the market. Not exactly something an average user should be expected to do but it’s better than nothing. Let’s hope that Google is able to resolve this with an OS update in the near future.

Resources:

https://code.google.com/p/android/issues/detail?id=79089
http://stackoverflow.com/questions/27041575/android-lollipop-error-code-505-during-installation-app
https://code.google.com/p/android/issues/detail?id=79375
https://forums.adobe.com/message/6942812#6942812

Animation with an Android ScrollView

Extend the Android ScrollView class and override the onScrollChanged method to animate your content based on the users current scroll position.

In this example I’m making changes directly to the margin of all RelativeLayouts to prevent the views from going off screen when the user scrolls. This code could easily be made generic and applied to any scroll view with linear blocks of content.

    /**
     * This can be made more generic and added as an AnimationPattern of the scroll view.
     *
     * @param scrollView
     * @param x
     * @param y
     * @param oldx
     * @param oldy
     */
    @Override
    public void onScrollChanged(ObservableScrollView scrollView, int x, int y, int oldx, int oldy) {
        int yScroll = y;
        double percentScrolled = (double)scrollView.getScrollY() / (double)scrollView.getMaxScrollAmount();

        if(y < 0) {
            yScroll = 0;
            percentScrolled = 0;
        }

        int diff = (mScrollingContent.getBottom()-(scrollView.getHeight()+scrollView.getScrollY()+mScrollingContent.getTop()));// Calculate the scrolldiff
        if( diff <= 0 && atBottom) {
            return;
        } else if(diff <=0) {
            // if diff is zero, then the bottom has been reached, do one more pass
            Log.d("CurrentTempFragment", "MyScrollView: Bottom has been reached" );
            atBottom = true;
        }else {
            atBottom = false;
        }


        // Layouts are 170dp tall
        int layoutHeight = (int)(170.0 * (1.0 - percentScrolled));
        int shadowPadding = 20;
        layoutHeight = Math.max(layoutHeight, 70);

        if(layoutHeight != 70) {
            // All layouts have locked. Allow the last layout to finish scrolling up
            scrollCap = yScroll;
        }

        // TODO: Instead of using relative layouts, create a class that knows it's min / max size
        for(int i = 0; i < layouts.length; i++) {
            // Convert from int to dp
            int toHeight = getDPI(layoutHeight, metrics);
            int toTopMargin = scrollCap + getDPI(layoutHeight*i - shadowPadding*(i+1), metrics);
            if(i < layouts.length - 1) {
                updateLayout(layouts[i], toHeight, toTopMargin);
            }else {
                // Special case for the last layout, it's taller and doesn't re-size
                updateLayout(layouts[i], toTopMargin);
            }
        }

        // Animate the sun up based on scroll index
        int padding = Math.max(300,(int)(getDPI(400, metrics) * (0.85 - percentScrolled)));
        mSunIcon.setPadding(0,padding,0,0);
    }

    public void updateLayout(RelativeLayout layout, int layoutHeight, int layoutMargin) {
        RelativeLayout.LayoutParams head_params = (RelativeLayout.LayoutParams)layout.getLayoutParams();
        head_params.height = layoutHeight;
        head_params.setMargins(0, layoutMargin, 0, 0); //substitute parameters for left, top, right, bottom
        layout.setLayoutParams(head_params);
    }

    public void updateLayout(RelativeLayout layout, int layoutMargin) {
        RelativeLayout.LayoutParams head_params = (RelativeLayout.LayoutParams)layout.getLayoutParams();
        head_params.setMargins(0, layoutMargin, 0, 0); //substitute parameters for left, top, right, bottom
        layout.setLayoutParams(head_params);
    }

Full project source code can be found here:
https://github.com/blackcj/Temperature