Control an IR Device with a Spark Core

Reading from sensors is great but there are times when you need to interact with surrounding hardware. Window air conditioners, televisions, stereos and many other household electronics communicate with infra-red (IR). Adding an IR LED to your spark core will allow you to control these electronics remotely. For example, I’m currently using a temperature sensor along with an IR LED and Spark Core to turn my window AC unit on and off based on ambient temperature and time of day.

There are two types of IR LEDs 950nm and 850nm. The type of LED you’ll need will depend on the specific device you plan to control. You may want to pick up a couple of each type to be safe. We’ll use an IR receiver to read the IR code from the devices existing remote.

[Update 10/19/2014] A 330 ohm resistor should be used with a 5v power supply (Arduino boards). The Spark Core has a 3.3v output so you should use a 100 ohm resistor instead. Switching to a 100 ohm resistor resulted in much better range for the IR LED. [/Update]

For this example you’ll need:
950nm IR LED $0.95
IR Receiver $1.95
– 100 ohm resistor 330 ohm resistor
– A Spark Core $39.00
– A soldering iron and solder
– An Arduino Board (optional)

Pro’s of IR LEDs:
– Cheap
– Easy to use
– Work with existing hardware

Con’s of IR LEDs:
– Requires physical proximity to the target device
– Signals are one directional (no feedback loop)

Pre-requisites:

Spark Core connected to your WIFI and ready to accept new sketches via the web interface. You should also be familiar with IR LEDs. There are plenty of tutorials available. In this example, we’ll be focused on the Spark Core specific hook up and code.

Step 1: Record Your IR Signal

Each button on your existing remote outputs a unique IR signal. Before you can send an IR signal with the Spark Core, you must first record that signal from your remote using the IR Receiver. I find it easier to use the serial output from a standard Arduino board (instead of the Spark Core). Record the raw signal from one of the buttons on your existing remote using this tutorial. Copy and paste the raw output, we’ll be using it later.

Step 2: Connect the IR LED to Your Spark Core

Use a 100 ohm resistor 330 ohm resistor. Connect the negative wire to the Spark Core ground. Connect the D3 pin to the 100 ohm resistor 330 ohm resistor and then to the positive wire of the LED.
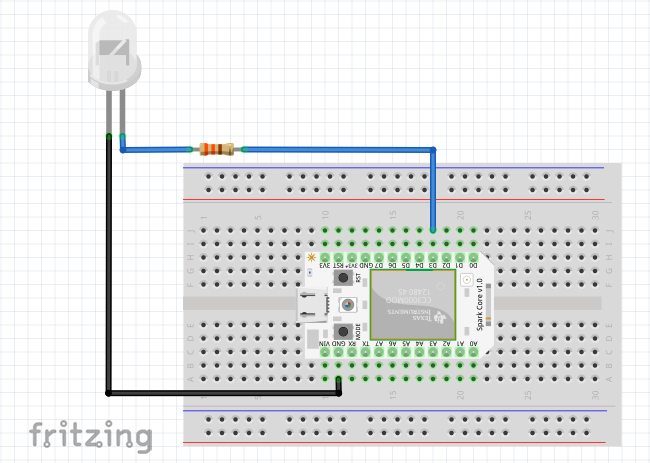
Schematic diagram

Step 3: Add the IRremote Library

Qwertzguy ported the IRremote library from Arduino to Spark Core. You can find the library here. Add the .cpp and .h files to your Spark Core project using the + button in the top right corner of your project.

Example code.

Step 4: Write the Spark Core Code (IRremote.ino)

// This #include statement was automatically added by the Spark IDE.
#include "IRremote.h"

int commadDevice(String args);

IRsend irsend(D3); // hardwired to pin 3; use a transistor to drive the IR LED for maximal range

// Use the raw code you recorded from your device, in this example the length of the code is 37
unsigned int rawCodes[] = {8300, 4200, 450, 1650, 450, 1650, 450, 1650, 450, 600, 450, 1650, 450, 600, 450, 1650, 450, 1650, 450, 4250, 450, 1650, 450, 1650, 450, 600, 450, 1650, 450, 600, 450, 600, 450, 650, 450, 600, 500};

void setup()
{
  Spark.function("toggle", commadDevice);
}

int commadDevice(String args)
{
    int rawSize = sizeof(rawCodes)/sizeof(int); // In this example, rawSize would evaluate to 37
    irsend.sendRaw(rawCodes, rawSize, 38);
    return 1;
}

Flash the new sketch to your device.

Step 5: Command Your Device

# EXAMPLE REQUEST
curl https://api.spark.io/v1/devices/YOUR_DEVICE_ID/toggle \
     -d access_token=YOUR_ACCESS_TOKEN
Failed to Find Android Wearable Dependency

Problem:

After installing Android Studio Beta and using the wizard to create a new wearable app, the Gradle build failed with the following errors:

Error: Failed to find: com.google.android.gms:play-services-wearable:+
Error: Failed to find: com.google.android.support:wearable:+

Solution:

[Update]Additional useful information: http://developer.android.com/preview/google-play-services-wear.html[/Update]

[Update 7/16/14]The latest version of Android Studio extends Activity for watches rather than WatchActivity[/Update]

Until we get an official update, there is a work around I found on this site.

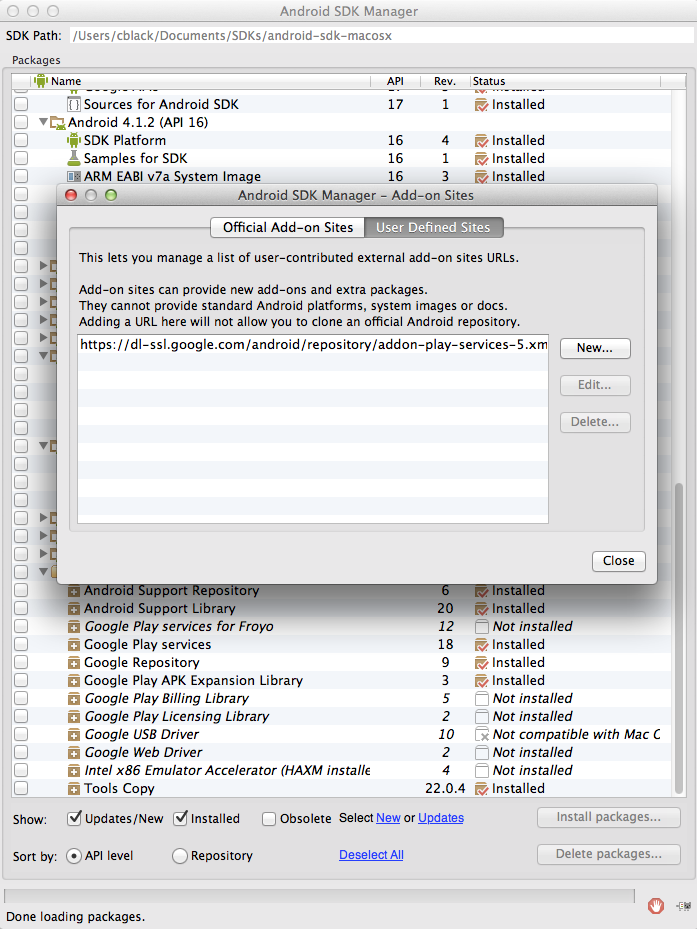
1. Open your Android SDK Manager.
2. Click on Tools -> Manage Add-on Sites… -> User Defined Site
3. Add https://dl-ssl.google.com/android/repository/addon-play-services-5.xml
4. Update your extras (Google Play Services and Google Repository)
5. Sync your project in Android Studio

Even after that, WatchActivity is still missing. Switching from WatchActivity to Activity seems to work but is probably not a good long term solution. Android Studio should now extend Activity instead of WatchActivity. If the wizard creates a project extending WatchActivity, update Android Studio. OK, now everything is building but the install fails for the emulator: Failure [INSTALL_FAILED_OLDER_SDK]

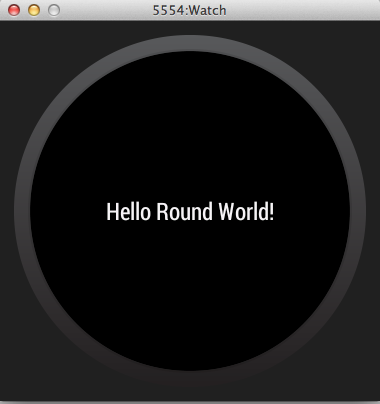
Changing the minSdkVersion, targetSdkVersion and compiledSdkVersion to 20 did the trick. Right now the watch system images are available at API 20 but the wizard sets everything up with ‘L’. Again, let’s hope this is resolved soon. Finally, I was able to get ‘Hello Round World!’ to show up on the emulator.

build.gradle in the wear folder

android {
    compileSdkVersion 20
    buildToolsVersion '20.0.0'
    defaultConfig {
        applicationId 'com.example.cblack.myapplication'
        minSdkVersion 20
        targetSdkVersion 20
        versionCode 1
        versionName '1.0'
    }
    buildTypes {
        release {
            runProguard false
            proguardFiles getDefaultProguardFile('proguard-android.txt'), 'proguard-rules.pro'
        }
    }
    productFlavors {
    }
}

Hopefully Google releases an update soon. I would expect another Android SDK Manager and Watch SDK update shortly that resolves these issues. I’m excited to start building apps for watches! Stay tuned for more wearable examples.

Spark Core with a Humidity / Temp Sensor (HTU21D)

Monitor the humidity and temperature of your home or apartment from anywhere. The Spark Core connects to your home WIFI and allows you to monitor or control devices remotely. In this post we’ll start with a basic sensor. The HTU21D sensor was the least expensive sensor I could find that monitored both humidity and temperature.

Update: The HTU21D library needs some minor modifications to work with the Spark Core. I’ve created a Gist with code you should use.

This hookup guide is slightly different than hooking the HTU21D to an Arduino UNO. You can find an UNO hookup guide here. The downside to using the UNO is that it requires more effort to make the data accessible via the web. The Spark Core makes web integration a snap! I use my UNO for tinkering and my Spark Core for my connected home projects.

You’ll need:
– A Photon $19.00
HTU21D sensor $11.95
Male to Female wires $1.95
Breakout Headers $1.50
– A soldering iron and solder

Pre-requisites:

Spark Core connected to your WIFI and ready to accept new sketches via the web interface. Solder 4 breakout headers to your HTU21D sensor for easy hookup using the male to female wires.

Step 1:

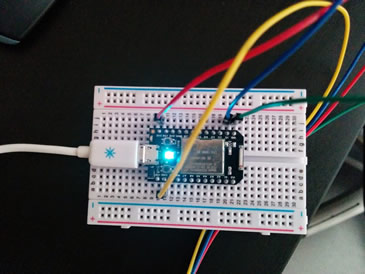
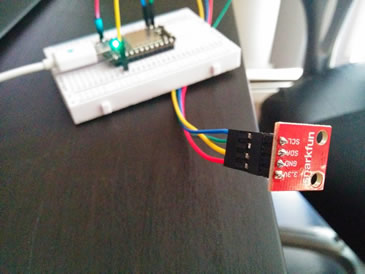
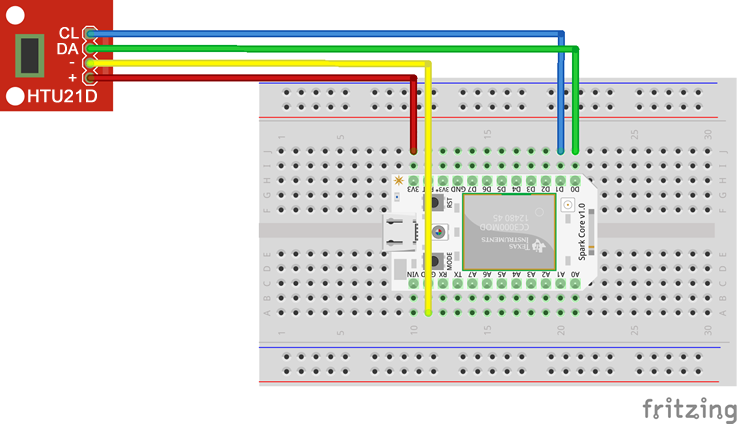
Connect the HTU21D sensor to the Spark Core. For accurate readings, make sure the sensor is at least 6 inches away from your board and heat sources.

Spark Core HTU21D

Click to zoom the images.

Breadboard Image

Step 2:

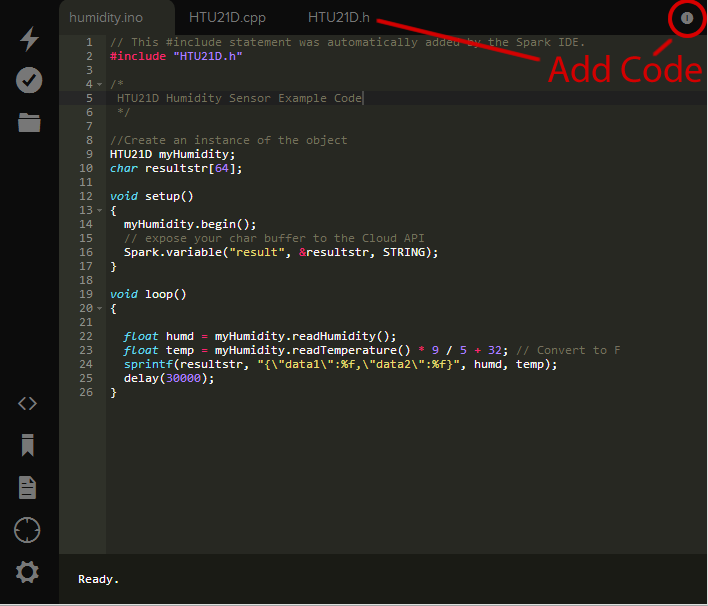
Create the Spark Core sketch. This sketch requires the HTU21D library that can be found on the Spark Fun product page. To include this library on the Spark Core, you’ll need to copy and paste the code into the tabs at the top of your sketch.

Humidity Sketch

Humidity.ino

// This #include statement was automatically added by the Spark IDE.
#include "HTU21D.h"

/* 
 HTU21D Humidity Sensor Example Code
 */

//Create an instance of the object
HTU21D myHumidity;
char resultstr[64];

void setup()
{
  myHumidity.begin();
  // expose your char buffer to the Cloud API
  Spark.variable("result", &resultstr, STRING);
}

void loop()
{
  
  float humd = myHumidity.readHumidity();
  float temp = myHumidity.readTemperature() * 9 / 5 + 32; // Convert to F
  sprintf(resultstr, "{\"data1\":%f,\"data2\":%f}", humd, temp);
  delay(30000);
}

Flash the new sketch to your device with the humidity.ino and HTU21D library files.

Step 3:

Use the Spark Cloud API to access the char buffer from your device.

https://api.spark.io/v1/devices/YOUR_DEVICE_ID/result?access_token=YOUR_ACCESS_TOKEN

Right now the results are in JSON and not visually appealing. In a future post I’ll walk through setting up a database, cron job and front end website to display the data.

Build a Single Page Web Application with Knockout.js

Knockout.js makes working with JavaScript much more enjoyable. The MVVM pattern helps to better organize code and keeps the UI in sync with the server. In the case of complex web applications, a framework like this is incredibly helpful. I would not recommend this library for static web content or sites that need to be SEO heavy. Developers with an Object-Oriented Programming background will be right at home with Knockout.js. Using the content provided by David Ly, I was able to quickly ramp up on this framework.

David Ly and I recently worked together to create a video tutorial series for Knockout.js. The video series walks through creating a simplified version of Google Docs, allowing users to create documents, spreadsheets and surveys. You can find the video series here:

http://www.packtpub.com/building-single-page-web-application-with-knockoutjs/video

Building a Single Page Web Application with Knockout.js

Knockout.js is a free, light weight framework you can use to build web applications.

Sample Video from Section 4:

Sections 1, 2 and 3 are pretty basic (starts out simple). Sections 4 and 5 get a bit heavier. Sections 6, 7 and 8 are code heavy, they dive into the more interesting features of Knockout.js. The video series is meant for people with a basic knowledge of HTML, CSS and JS.

Additional Resources

Knockout.js: Building Dynamic Client-Side Web Applications
Knockout.js Homepage link
Knockout Context Debugger – Chrome Extension link
Knockout.js Plugins link